You can always tell when it's half term or a school holiday - I get to paint and post! Here are the second batch of Viking Heathguard.
Next on the paint table Viking archers and then the Napoleonic Prussian Infantry.
Showing posts with label Saga Rules. Show all posts
Sunday, 10 June 2012
Friday, 8 June 2012
Metal Gripping Beast Saga Viking Heathguard
When I started building my Saga Viking warband, I painted up a box of plastic Gripping Beast Hirdsmen. It was only on completing them that I realised that I would never field eleven points of Heathguard! I suplemented the Hirdsmen with Metal levies and warriors from the beast, but I felt that they did not fit in well with the plastics I already had.
It was at this stage that my OCD kicked in (come on all of us wargamers are on the spectrum) and I replaced the plastic Hirdsmen with metals (the plastics are currently on ebay).
The first 2 points worth are pictured below, painted, washed and varnished with Citadel paints.
Next on the paint tray, another 2 points of Heathguard.
Thursday, 7 June 2012
Napoleonic Prussian Uhlan Lancers
Every wargamer has got one, you know who i'm talking about - he is the hobby equivalent of the Heroin dealer (go on mate try it, it's great you'll love it!). His sole purpose in life is to spend your hard earned money on the new period or genre of gaming that he is also now playing.
Well mine, i'll not name him, but he knows who he is, don't you Stu? has finally got me to take the plunge into 28mm Napoleonics.
I have always been a little wary about painting Napoleonics, worried that my painting would not do the uniforms justice,but I finally took the plunge and bought some Prussians from Perry Miniatures. (All other nations are already being painted by guys at the Wyvern Wargamers Club (http://wargamers.worcester-county.org/)
I'm in the middle of painting my metal Gripping Beast Viking Heathguard to replace the plastics I started with, but could not resist starting on the Prussian Cavalry. For what they are worth, the pictures show my first three, painted with Citadel paints. The bases need to be flocked etc.
Now to finish my Vikings so that I can crack on with the rest of the Prussians!
Wednesday, 25 April 2012
Saga Wargames Scenics 2 - The pond
Well you can tell the new school term has started; my hobby time has reduced to almost zero again. I have, however, managed to finish my second drop on piece of scratch built terrain for Saga (and any other 28mm game to be fair!)
The model, a small pond with a small 'duck island' in the middle, started in a similar way to the field.
The banks of the pond were made with pieces of cork sheet and then covered in polyfiller. Cork rocks were then glued into the water area.
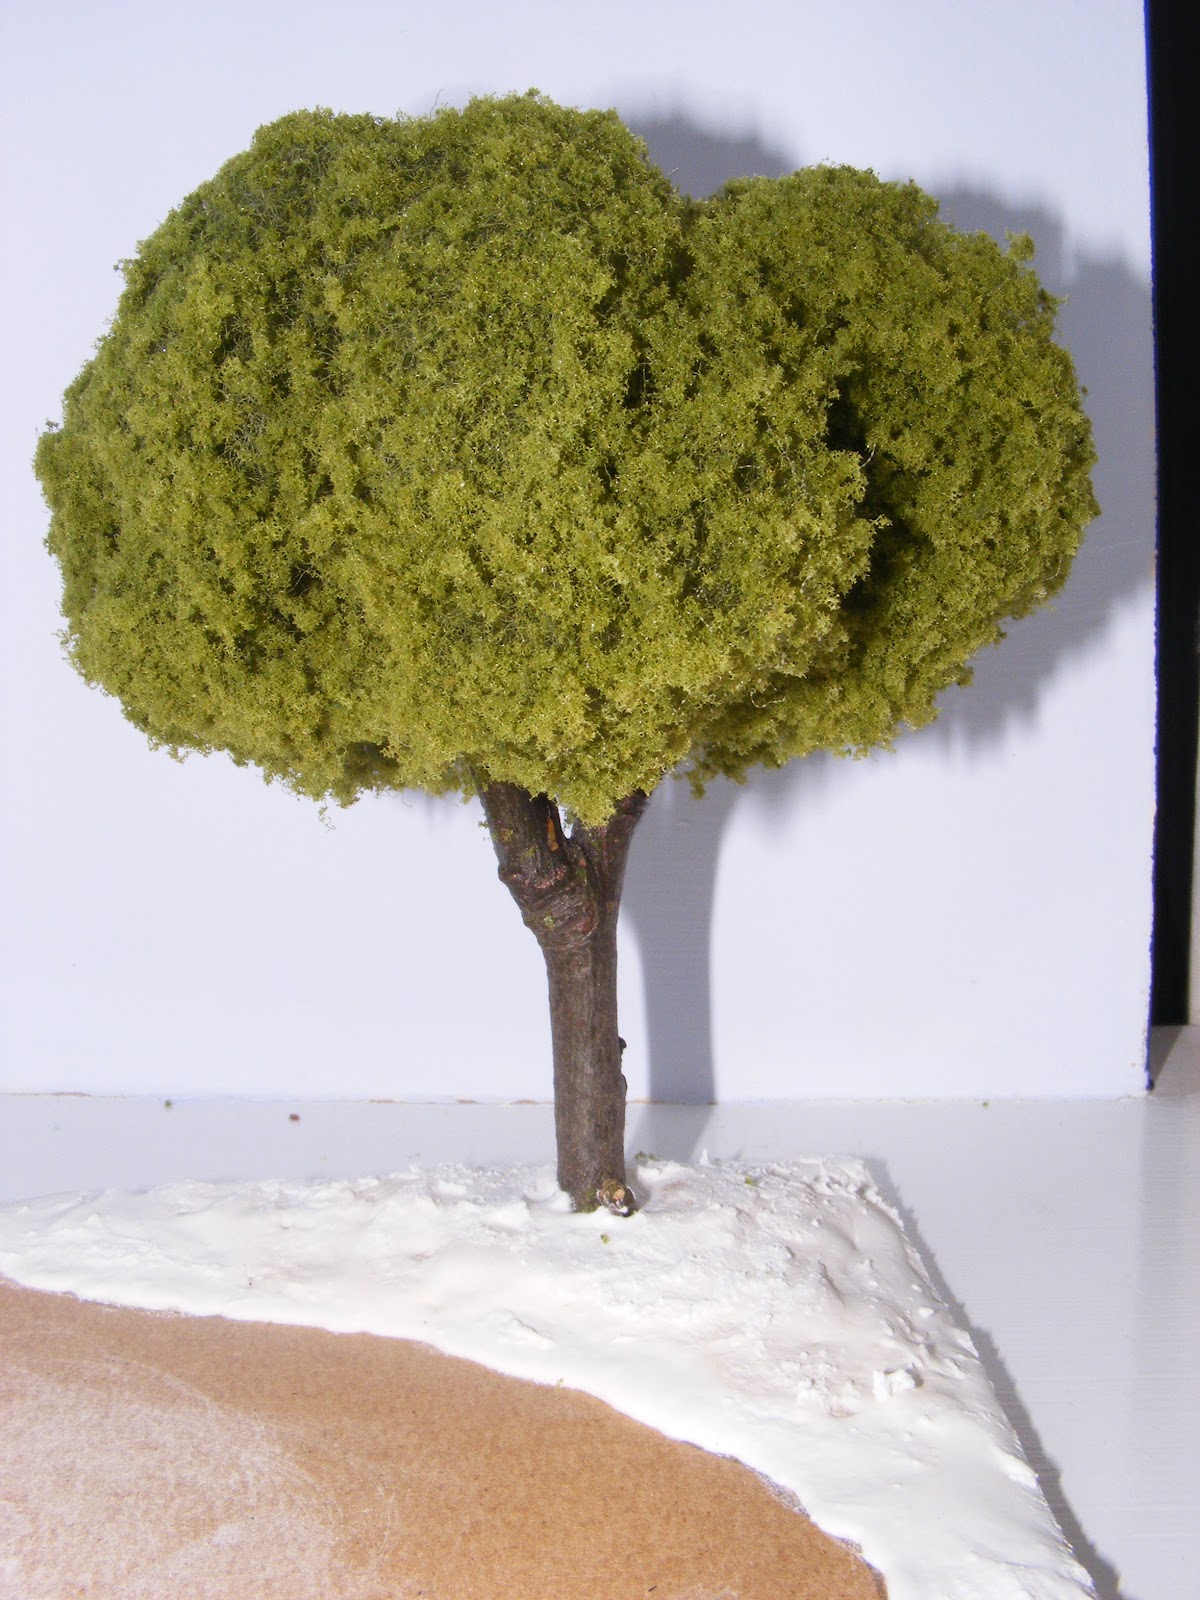
I tried a different method with the trees this time. Unable to source rubberised horse hair this time (I was too inpatient to wait for an internet order) I purchased a bag of Woodlands Scenics 'Poly Fiber'. It's a cross between cotton wool and wire wool that simple is stretched and pulled into the desired shape. As this was my first attempt at using it I think I may have used too much -it could have been stretched further. Once the desired shape was reached I glued it onto twigs found in a local wood.
Next I spayed the fiber with ultra strong hold hairspray and sprinkled on green flock. I then repeated this process until the tree was covered. The fact that the fiber is green means I used less flock than on the horsehair. The effect can be seen below.
The trees were then drilled and attached to the board by wood screws.
Next I covered the bank and island in PVA glue and sharp sand. Once dried I painted the 'soil' in Homebase emulsion - Double expresso undercoat followed by dry brush highlights of chocolate and then pebble.
Lumps of foam tree foliage were glues to the bank to make bushes and these were followed by clumps of reeds in the water. The water area was then painted using Vallejo Reflective Green. Once dried the water was painted in Citadel Gloss Varnish. To finish off the model static grass flock was glued on using watered down PVA.
The completed model (a long Saga terrain piece)
Below, a close up showing bank and island detail.
Sunday, 8 April 2012
Saga Scenics Part Four - Finishing Touches
The final (well almost) stage of the construction is the addition of clump foliage for bushes and scenic scatter (of flock) for grass.
I used a dark green clump foliage for bushes, which I glued on using PVA. After that had been allowed to dry I then added a light green flock using watered down PVA. I was going to add lines of flock to represent partially grown crops, but decided (with my good lady's advice) that less is more.

I used a dark green clump foliage for bushes, which I glued on using PVA. After that had been allowed to dry I then added a light green flock using watered down PVA. I was going to add lines of flock to represent partially grown crops, but decided (with my good lady's advice) that less is more.
Saga Scenics Part Three - Painting the base
The next stage was to paint the base to look like a muddy field. Normally I use Citadel paints, however due to the size of the models this would be quite pricey. Instead I bought a range of Homebase tester pots, at only £1.49 each they are far more cost effective than any model paint.
The first step was to paint the whole base in 'Double Espresso'. Now the weird bit - I actually painted the tree trunks too. Firstly, one had split exposing the screw and secondly, the actual twig didn't look natural enough in 28mm scale!
Next, I drybrushed the model with 'chocolate' (quite appropriate considering the day!)

A note on drybrushing - I am a great believer that less is more when drybrushing - it is much better to reload your brush several times and gradually build up the coats. Firstly I use kitchen towel to scrape off the excess paint and then brush off more on a separate piece of towel. Then, I 'Dry brush the back of my hand until I cannot feel any moisture, only then do I introduce the brush to the model. This process is repeated until the require shade is achieved.
The first step was to paint the whole base in 'Double Espresso'. Now the weird bit - I actually painted the tree trunks too. Firstly, one had split exposing the screw and secondly, the actual twig didn't look natural enough in 28mm scale!
A note on drybrushing - I am a great believer that less is more when drybrushing - it is much better to reload your brush several times and gradually build up the coats. Firstly I use kitchen towel to scrape off the excess paint and then brush off more on a separate piece of towel. Then, I 'Dry brush the back of my hand until I cannot feel any moisture, only then do I introduce the brush to the model. This process is repeated until the require shade is achieved.
After only minimal drying time (enough time to remove the seal and lid from the next pot) I drybrushed the whole model again using 'pebbles'. I didn't clean the brush from the last stage, which helps the shades of brown graduate more.
Friday, 6 April 2012
Saga Wargames Scenics Part Two - Trees
I designed the terrain pieces with the intention of having scratch built trees attached to the base.
The first stage of the tree construction involved searching for twigs in a nearby copse of trees. I then glued rubberised horse hair to the twigs. (below)
Next, I affixed foliage flock to the horse hair by repeatedly spraying it with Morrisons extra firm hold hairspray, sprinkling the flock and then drying with a hairdryer. This process was repeated until the tree was covered. (below)
I then fixed the the trees to the base by first drilling a hole in the base and then attaching the tree with a thin woodscrew from the bottom of the base. I then filled in the gap around the base with filler. I had already built up parts of the base with polyfiller and then covered it with PVA and sharp sand. (below)
Next stage is to paint and flock the base.
Wednesday, 4 April 2012
Saga Wargames Scenics Part One
We had a great night of Saga at the Wyvern Wargamers club (formally Evesham Wargames Club). My Vikings performed wonderfully, played two won two. Having currently nothing on my paint table from my live projects (I have plenty of dead metal to paint) I was wondering what to do next. Paul, one of the guys at the club, scratch built a pond and this inspired me to start some scenics of my own.
To start with I sketched a rough plan onto the hardboard base and then glued cork sheet on to build up raised areas. The three pieces are: A pond, a small cultivated field and a larger cultivated field. The holes in the cork are for trees.


Sunday, 15 January 2012
Saga Wargame at The Evesham Wargames Club Jan 15th 2012
I will be introducing one of the lads at The Evesham Wargames Club to Saga - the Dark Ages skirmish game tonight.
Below are pictures of the Viking Warband that I propose to use, led by my newly finished Warband leader and his bodyguard.

The six points consist of: My Warband leader (foc) 3 x 4 man Hirdsmen (1 x 4 converted to Berserkers), 2 x 8 man Bondi ansd 1 x 12 men levies.
My new leader has beeb based together with two retainers on a 40mm square base (in line with the rules). The figures are Olaf Trygvasson and Retainers from Gripping beast. (One retainer did'nt make it to the beast, but has joined the ranks of the warband) As ever Citadel paints and washes were used for the paint job.
My right flank showing Berserkers, Hirdsmen and Levies at the rear (the eagle eyed among you will notice that the levies are mixed with hirdsmen with spears - in the game they will represent levies - I haven't got enough levies painted yet. Under the rules you cannot have mixed units).
Below are pictures of the Viking Warband that I propose to use, led by my newly finished Warband leader and his bodyguard.
The six points consist of: My Warband leader (foc) 3 x 4 man Hirdsmen (1 x 4 converted to Berserkers), 2 x 8 man Bondi ansd 1 x 12 men levies.
A battle report will follow, and with the will of Odin and Thor we will be victorious!
Thursday, 29 December 2011
Gripping Beast Small Saxon Hut .... and cattle
I ordered a small, resin Saxon house from the chaps at Gripping Beast in order add a little scenery to my Saga game board (My original plan was to buy one and then make scratch built duplicates).

When the model arrived, I was delighted with the quality; the resin was well cast and did not require any alteration filling or filing at all. The term 'small hut' is quite literal here - the model only measures 7cm x 8cm.
As ever, I have painted the model with a combination of Citadel and Vallejo paints.
The cattle were provided free of charge by the beast as an apology for the building being out of stock when I placed my order - now I need some peasants to tend them and live in the hut!


Next out will be a 40mm square based Saga Warlord with bodyguards.
Wednesday, 21 December 2011
Gripping Beast Viking Berserkers
One of the rules specific to Vikings in the Saga rule set, allows one unit of 4 Heathguard to be designated Berserkers. Each figure generates 4 melee dice instead of the normal 2, but reduces armour to 3. With such an aggressive attack bonus, I decided I had to have some for my force.
Quite conveniently, the chaps at Gripping beast do a pack of four Berserkers. The pack includes a variety of weapons and four shields. I decided to only use two shields and use the spares as fatigue markers (see earlier post).
My finished models are below - as ever they are painted with a mix of Citadel and Vallejo paints.
Monday, 19 December 2011
Warband Leader (A Gripping Beast Freebie)
Those of you that bought the Saga Ruleset from the chaps at Gripping Beast will recognise this figure as the freebie that came with the rules and dice pack. I decided to paint him up as another warband leader - the rules allow for subleaders in larger games.
Painted as ever with Citadel paints, pics are below.
More Gripping Beast Bondi Vikings
Well, the Christmas holidays paintfest gathers momentum... I'm actually in danger of running out of lead!!
Here are the next batch of Gripping beast Bondi - the only problem I had was attatching the weapons, lots of cutting and filing was required!
Saga Fatigue Markers
One of my pet hates about wargaming is seeing tables cluttered with tokens and markers. One key element of the Saga rule system is fatigue markers. I decided to use some of the extra shields I have as fatigue markers.
Not being satisfied with just the shield, I glued them onto a penny along with a piece of scenic cork. I then covered the base in sharp sand and painted it to match the bases of my figures. The finished markers are below.
Subscribe to:
Posts (Atom)